
June 1, 2011: Update
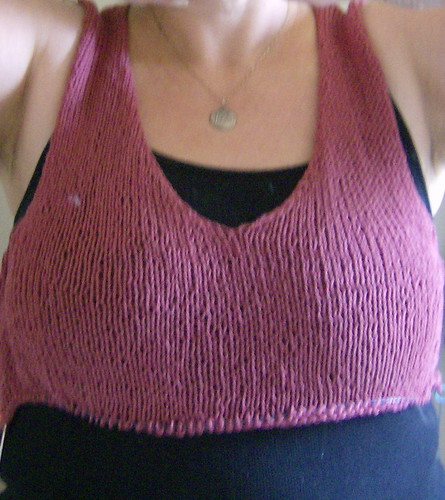
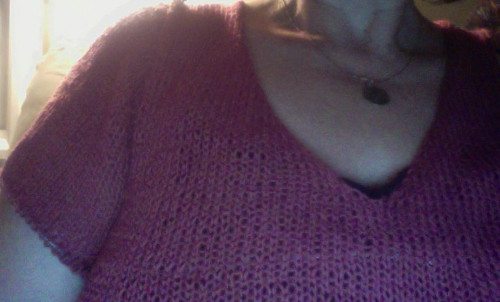
Here are some updated photos - as of this evening (Wed, June 1) - I finished both sleeves. I decided to make them 3/4 length. I am back to knitting downward to the bottom of the sweater.
Also, I have finished writing the pattern, I now need to type it up. I am going to publish two patterns in one. One in top-down seamless construction and the second one in traditional, knit in pieces, sewn together construction.


I am posting notes and am answering questions in my group on www.ravelry.com
If you are not a member of Ravelry, it is a super website, it is free. I compare it to facebook for knitters. The group's name is: Designed by Vera Sanon - SunfunlivingKnits
The pattern should be ready by Sunday afternoon (June 5th) - subject to change since I am traveling all this week and weekend. But if I have to push back the date, it will be no longer than a few days.
The sweater is knit in Sport or DK weight yarn knit at a bigger gauge to achieve the loose fabric.
Yarn Suggestions:
Euroflax (Sport or DK weight yarn) - 100% linen
Elsebeth Lavold Hempathy
Rowan Panama
Knitpicks CotLin
Universal Yarns Summer Cotton (discontinued but still being sold in some LYS)
I will add to this list as I get suggestions from other knitters.
Yardage: approximate yardage - between 900 (950, 1,000, 1,050, 1,100, 1,200) yards for the respective sizes - 32 (36, 40, 44, 48, 52)” with long sleeves.
Gauge: 16 sts = 4"
Row gauge approximately 24 rows = 4" (though row gauge is not as crictical).
Make sure to swatch. You should also wash and block the swatch to ensure correct gauge.
Please note that worsted or aran weight yarn will get you the gauge, BUT the fabric will not be loose and open. I would not recommend using that heavy kind of yarn unless you do not mind a dense fabric.
The sweater pattern will be for a top-down sweater with set-in sleeves. If you have never worked a sweater that way, look below for construction hints and photos.
I will update this as I knit my prototype sweater, so check back.
The way you work this sweater is that you Cast On at the top shoulder for the back, you work down toward where you join the front/back (underarm).
Then you pick up stitches from the left cast on edge and work the front left side:
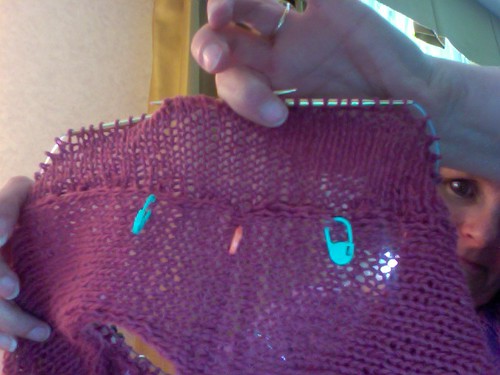
I use the removable markers to keep track of the increases - it just helps me count since I do not seem to be able to count beyond 2 without loosing track. :)
Then you do the same for the right front side:
Then you join the two fronts and work them into one piece.
Once you have the armhole shaping worked for the front, you join the front and back and work it in the round.
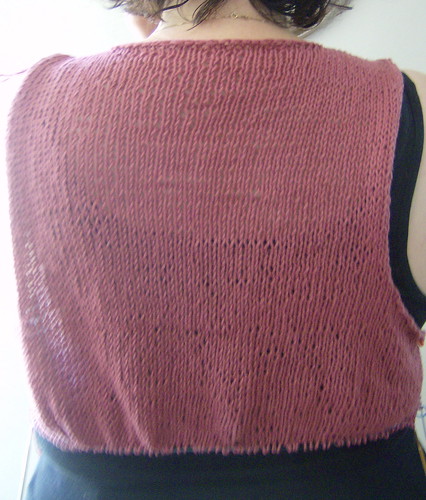
Keep in mind as you are looking at the knitted material/fabric, that this is unblocked. Once you block the fabric, all the uneven stitches come out smooth and even looking.
Sleeves - are knit onto the armholes (I will post construction step-by-step photos this week).
I did have a minor set-back... I was done with one sleeve down to the elbow. The entire time, I thought that I had made the sleeve to loose. I was right, when I tried it on, it was too loose... so I frogged the sleeve. I will start over again on the sleeve today (Monday).
*Photo of sleeve - before frogging it:*
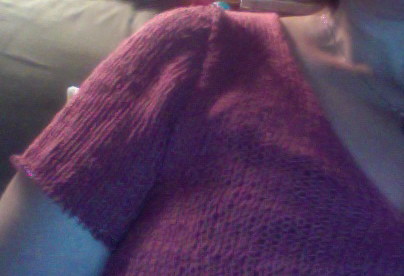
Do you see where it "bunches" --- at least next time, it will be a perfectly fitting sleeve! However, if you have chunky arms, you can easily enlarge the sleeves (see above photos).
I will post notes on how to make the sleeves bigger for us ladies with "generous biceps". :)
How do you work the sleeves?
The pattern will have detailed instructions including the # of stitches that you need to pick-up around the armhole edge.
Here are basic instructions how this way of knitting sleeves works:
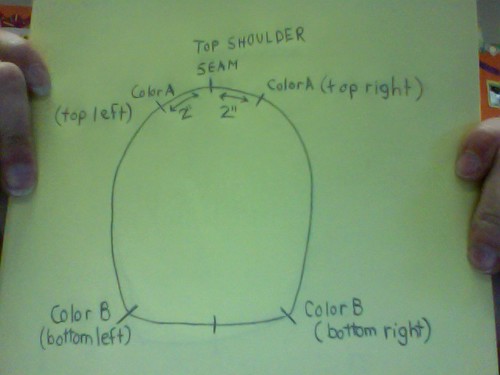
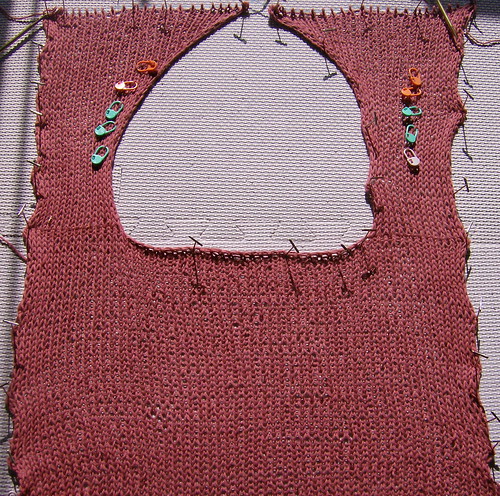
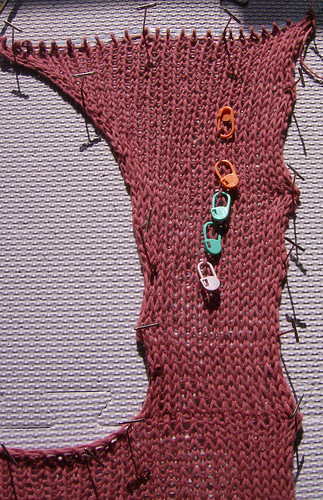
You position removable stitch makers at specific points around the armhole edge.
You place three removable stitch markers in Color A at the top of the armhole:
- one at the top seam
- one 2" to the right of the top seam
- one 2" to the left of the top seam
(see diagram above)
You place three removable stitch markers in Color B at the bottom of the armhole:
- one at the bottom seam (where the front/back is joined)
- one to the right of the bottom seam (where you worked the shaping increases)
- one to the left of the bottom seam (where you worked the shaping increases)
(see diagram above - the measurement from the center seam to that increase point depends on the size of the sweater you are knitting - specific instructions are included in the pattern)
You pick up stitches all around the armhole edge starting from the top-right removable stitch marker in color A (specific number of stitches to be picked up are included in the pattern).
Tip - Use a smaller needle to pick up stitches, for example if I am working on a size U.S. 6 needle, I will use a size U.S. 2 needle to pick up stitches. It prevent holes in the "seam".
You work one round from the top-right removable stitch marker in color A - ending the round the stitch before that stitch marker.
Next, you start working short rows, starting at the top-right removable stitch marker in color A, knitting across to the top-left removable stitch marker in color A. Once you reach the stitch marker, you work two more stitches and wrap-&-turn the next stitch.
Next, you work a wrong side row in purl stitch, from the top-left marker to the top-right marker, plus two more stitches and wrap-&-turn the next stitch.
You have to make sure to pick up the wrapped stitches as you knit or purl across them. There are great tutorials on line that show you how to work wrapped stitches either in a knit stitch or purl stitch.
You work back and forth like this until your reach the bottom-left and bottom-right markers. From that point forward, after you finished the last purl row, you wrap-&-turn. Then you work the next knit row and from this row forward just continue working the entire sleeve/armhole in the round.
The reason you have the bottom right markers is that those markers signal to you when you start working in the round (finished with the short rows) and they signal the stitches that have to be worked in a decrease (gusset like) in the upcoming rows.
Every second row (once you start knitting in the round), you will decrease 2 stitches at the bottom of the sleeve. That give the sleeve great shaping.
The pattern explains how to work those decreases in detail. (I will include more photos and sketches).
Once all the decreases for the underarm area are finished, you continue working in the round until your sleeve is long enough. For a short sleeve, you do not work any more decreases, but for a long sleeve you will decrease 2 stitches every inch for a while to shape the bottom of the sleeve (passed the elbow, down the forearm).
wow this is so cool. thanks
ReplyDeleteLaurie is right, that is extremely cool and you are awesome.
ReplyDeleteAm still in two minds whether my pattern-reading skills stretch far enough to join in but I shall definitely be following with interest.
Wow! I can't wait to buy this pattern from you and make my own!
ReplyDeleteGoodness how many Lauries are there? hehehehe
ReplyDeleteVera can't thank you enough for this -- my internet is out right now (since yesterday, oh happy day!) but when I'm back online and not posting from my iphone I'll email you back. I just wanted to say I'm crazy impressed at how fast you are!
--laurie
Vera, you are awesome.
ReplyDeleteVera, you are totally awesome - both for your patterning skills and for including a large size I can actually wear!
ReplyDeleteI agree, your pattern skills are amazing!
ReplyDeleteI have NEVER made a sweater quite this way! It is awesome! What kind of needles are you using?---I hope straights can be used though out or adjusted so that they can be used for everything even the sleeves---
ReplyDeleteI've never made a sweater before... I think this might be my first one. Such a cool pattern -- but I think the joining thingy in front is going to be a mess when I do it... But I'll manage something.
ReplyDeleteNow I have two awesome knitters to follow on the internet. :-)
ReplyDeleteGreat work!
I'm so excited about the KAL and your pattern! I have knit two top down sweaters, one with set-in sleeves. I am happy with both sweaters, however, I'm hoping to get more guidance regarding the sleeves. I ripped out one sleeve three times because it was either too loose or too tight. What a talent you have1
ReplyDeleteLooking forward to knitting this! Thank you, Vera for getting right on it and putting a smile on all of our faces!
ReplyDeleteHow exciting! This is so much fun and you're doing such a great job!
ReplyDeleteThanks, Vera, for doing this AND for making the largest size -- Looking forward to getting started!
ReplyDeleteI'm a crocheter, but this makes me WISH I could knit!
ReplyDeleteVera, you SO rock! Thanks for sussing out all of the details on this sweet, summery sweater! Can't wait to play in the KAL for it! :)
ReplyDeleteIt's so cool to see a designer's mind at work. I definitely have to follow along on this.
ReplyDeleteVera, you are an amazing knitting woman. I can't wait to knit this and see what else you've designed.
ReplyDeleteI would love to knit this sweater, I have some 100% baby alpaca and some Andean Treasure from Knit picks which is also Alpaca. I have been told that Alpaca tend to stretch if not seamed and I was hoping to do the seamless one.....any thoughts on this?
ReplyDelete